“That Spicy Potato Mixture”
7 Jun
We’ve gotten quite a few requests for the recipe for the meal that everyone (including the marmots) loved on the trail. It’s from trail cooking.com. They have a ton of back country trail recipes, so if you’re looking for ideas, start there.
DOUBLE POTATO CHOWDER
Ingredients
| 1 | c | dried instant hash browns |
| 1⁄4 | c | diced dried onions |
| 4 | t | low sodium vegetable or beef bouillon |
| 1 | t | dried parsley |
| 1⁄4 | t | diced dried garlic |
| 1⁄4 | t | dried thyme |
| 1⁄4 | t | ground black pepper |
| 1⁄2 | c | instant mashed potatoes |
| 1⁄4 | c | shelf stable parmesan cheese |
| 1⁄2 | c | fried onions |
| 1 | T | olive oil (1 packet) |
| 4 | c | water |
Instructions
At home: In a sandwich bag pack the hash browns through black pepper. In a second bag pack the mashed potatoes through the fried onions. Tuck in the oil.
In camp: Add the vegetable/seasoning bag and 4 cups water to your pot. Cover and set aside for 15 minutes for the vegetables to re-hydrate Add the oil, stir well and bring to a boil. Lower the flame to low, cover and simmer on a low boil for five minutes. Turn off the stove and the contents of the cheese/potato bag to the pot. Stir well, taste for seasoning and more pepper and salt as desired.
Step 3: DON’T FEED THE MARMOTS.
More tips and recipes from our Trail Chef, Jen in earlier entries:
http://themuirproject.com/trail-chow/
http://themuirproject.com/backcountry-pizza-recipe/
Recipe from trailcooking.com
San Francisco Screening with Special Meaning
21 May
I am so excited to be hosting a screening of “Mile, Mile & A Half” as a fundraiser for the National AIDS Memorial Grove on June 12th in San Francisco at the Westfield Century 9. For the past few years, I have worked as a volunteer with the Grove, helping on work days, in the office, and at the annual gala, so the mission of the Grove is very near and dear to my heart.
In 2011, I was just hiking the John Muir Trail a couple of weeks behind the MMAH team, from July 20th through August 10th. For me, seeing the film brings back memories in sharp detail… from the deep stream crossings to the challenging snow drifts, it is all there on the screen as a video souvenir of my hike. I was overwhelmed by the beauty of the JMT as a south-bound hiker. Each pass became higher and higher, and the vistas became more and more incredible. I could just imagine John Muir himself experiencing the sights for the first time.
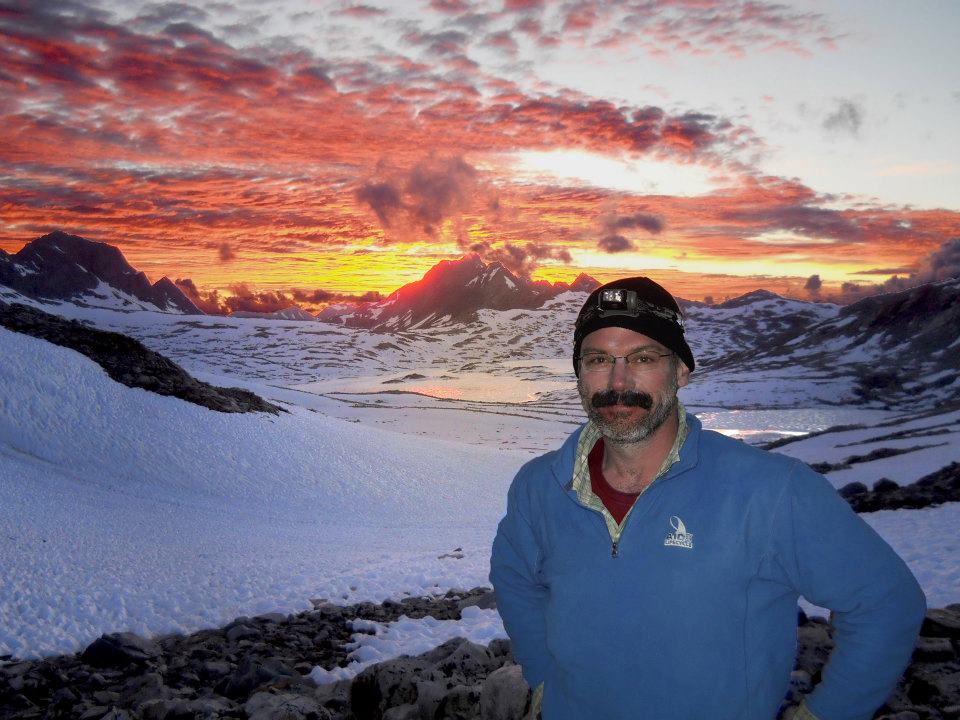
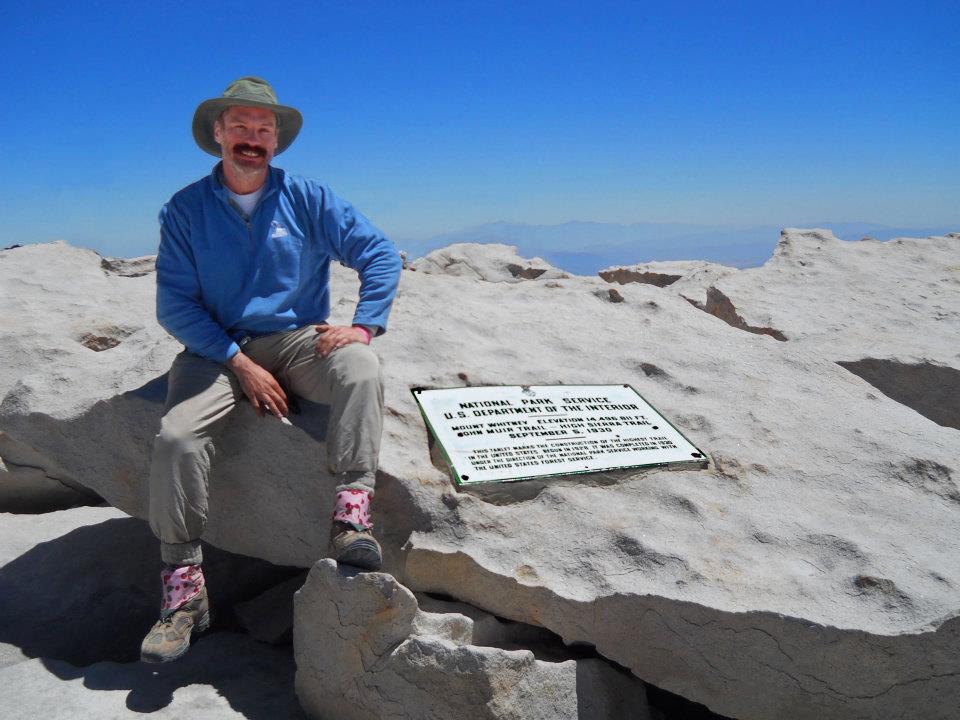
Two of my most special moments on the JMT were camping near the stone hut at Muir Pass, taking in the majesty of a fiery sunset, along with the breaktaking views from the top of Mt. Whitney, filled with a sense of accomplishment for a job well done. While it is impossible to describe the John Muir Trail fully, it is true that a picture is worth a thousand words… “Mile, Mile & A Half” does an amazing job capturing the majesty and mystery of this wonderful Trail.

I was so inspired by my 200+ mile John Muir Trail hike, I tackled the Appalachian Trail the following summer, becoming the first HIV-positive man to hike over 2,000 miles on that famous footpath. To be perfectly honest… the Appalachian Trail has its moments, but mile for mile, the John Muir Trail has the AT beat. There is nothing as spectacular as the JMT, in my mind.
Through Tugg, we have set up a screening of the documentary, as well as an online fundraiser. Guests can donate anywhere from $10 to $100 to support the work of the Grove, with incentives at every level for each donor on Tugg.com. I hope everyone in the Bay Area will come out to see this fabulous film.
Ross Hayduk
San Francisco, CA
John Muir Trail and El Camino
18 Feb
Our next guest blog is sent from traveler (and Durand’s mom) Anne Trench. Glad we could inspire you. Thanks for doing the same for us!
———————————–
“I only went out for a walk, and finally concluded to stay out till sundown, for going out, I found, was really going in.” John of the Mountains: the Unpublished Journals of John Muir, 1938
Some years ago, I learned of a spiritual journey, an old pilgrimage route called the Camino Santiago in northern Spain. Since the middle ages (if not before), pilgrims from all over the world have walked this path that follows old Roman roads. They walk to the city of Santiago de Compostela, where St James, one of the original 12 apostles, is said to be buried. Many continue to Finisterre, a promontory on the Atlantic that people in Roman times thought was the end of the earth.
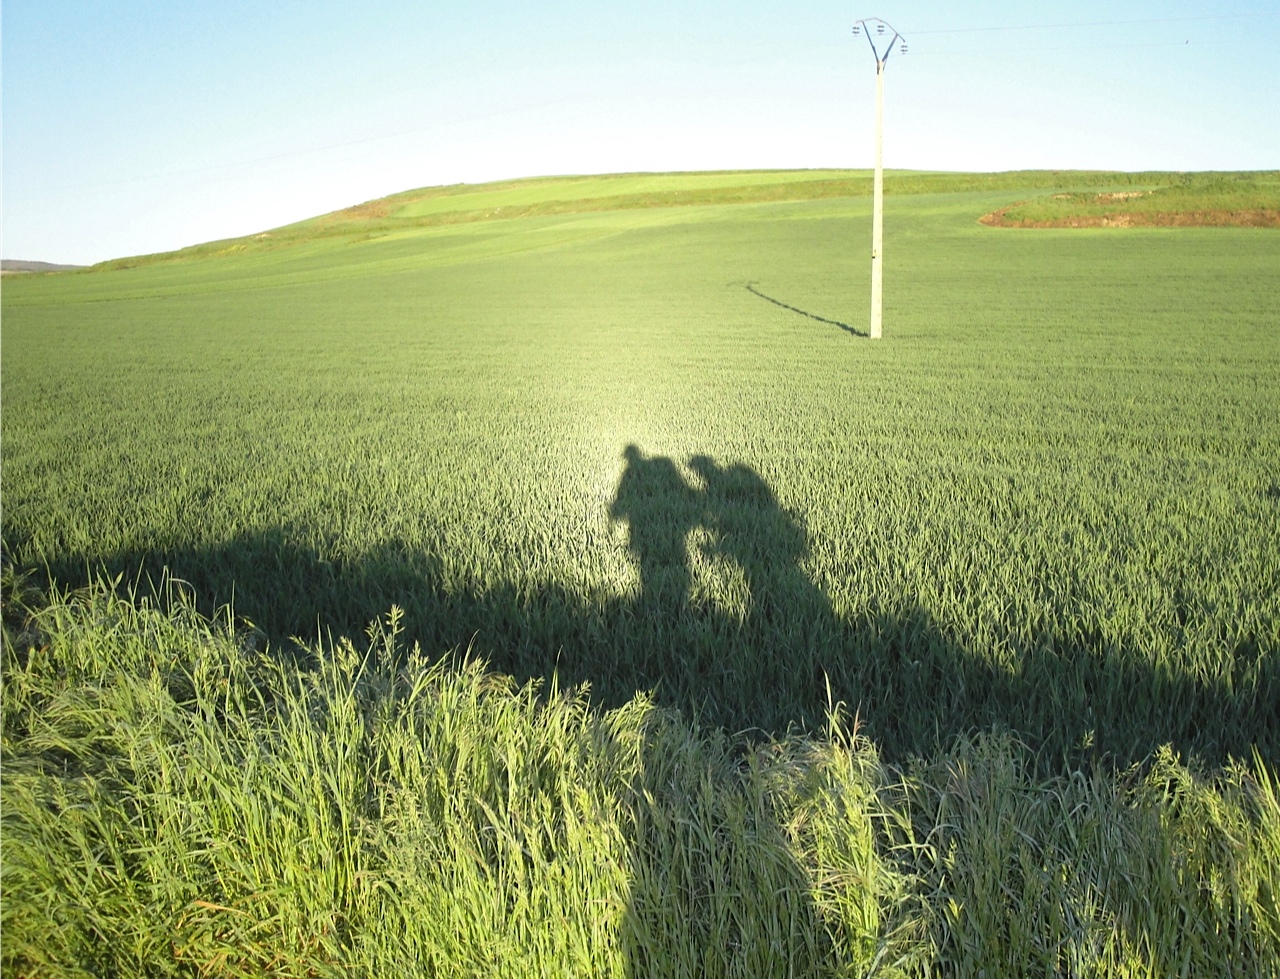
The Camino Frances, the most popular of the many Camino routes, leads pilgrims over the Pyrenees in southernmost France and some 500 miles across northern Spain. Today peregrinos walk for many reasons, some to ask for intersession from St James, some to lose weight, and some just because it’s there. Like John Muir, I want to walk it to go in.
At age 63, can I really walk 500 miles, going day after day? When I told my husband, John, I was going last fall, alone if I had to, I’m sure he thought I was crazy. Seeing Durand’s film, Mile, Mile & a Half was a tipping point of sorts for me and perhaps, for John too because soon after he decided to come.
And the more I learned about John Muir, the more I knew that for me Muir and the Camino are connected. Did you know that Muir began adulthood as a promising young inventor and industrialist? He was well on his way to success when he was nearly blinded in a factory accident. To heal, he had to sit for three months in total darkness with his eyes bandaged. When the bandages came off, he literally walked away from his previous life (1000 miles from Kentucky to the Florida Keys) and never looked back. Had the stillness of those dark months led him to enlightenment? He certainly led the rest of his life as if it did.
For us, the Camino starts officially tomorrow from the Porte D’Espagne in St Jean Pied de Port, France. Will it change our lives? Who knows but like John Muir, we will “go out to go in” and see what happens…


MMAAH documentary: Yosemite in Antarctica
4 Feb

Guest Blog from friend at Topline Magazine, Chuck Watson
It might be best to begin with a short introduction to the US Antarctic Program (USAP) for those that are not fully immersed with the details of the United States’ involvement with the continent of Antarctica. The US currently operates 3 full time year round research stations, several other temporary or seasonal camps, and two Scientific Research Vessels all scattered about this cold empty white landscape. There is the relatively massive McMurdo Station (1000 people strong), the South Pole Station (coming in at 120 people), and lastly Palmer Station with about 40 people. Both the McMurdo and South Pole stations are accessed by aircraft flown through the country of New Zealand, meanwhile Palmer Station can only be accessed by ice breaker which you reach in either Chile or Argentina. The US maintains these stations, camps and vessels for the sole purpose of supporting scientific research on this last truly wild continent.
This is my 9th time in Antarctica – having started with the USAP in 1999. Overall, I’ve spent a sum total of about 2 years of my life “south of 60” which is another way of saying south of 60 degrees latitude. In that time I’ve come to establish a genuine appreciation for these colder climes. Antarctica itself is often summed up like this: It is the coldest, highest, driest, windiest, and loneliest continent on Earth. It, like Alaska goes through extended periods of 24 hour sunlight in the southern summer and equal but opposite periods of 24 hours of darkness in the southern winter. The communities of the USAP are tight knit, hardworking, and fun loving. People from all over America commit anywhere from a few weeks to 14 months of their lives at a time to either perform or support the activities of science. We do everything from operate massive & complex astronomical telescopes, to plying the frozen oceans in search of wildlife, to washing dishes and everything in between.
This year I am deployed to Palmer Station, and it’s my first time to this small but charming facility. It itself is located in an archipelago on the small Island of Anvers which can be found on the Antarctic Peninsula just south of Chile and Argentina. The station is nestled right up against the water of the Hero Inlet – a small bay that provides some refuge from Antarctica’s unforgiving waters. The facility is small but comfortable, offering dormitory style berthing (1-2 to a room), incredibly well prepared food, a self-service bar, a TV Lounge, craft areas, a cozy “living room” with a fire place where we eat, full service Internet through satellite connectivity, and laboratory space for all the scientific efforts.
People pass their off time here in a myriad of ways; there are devotees of card playing, avid and astonishingly productive knitters, ping pong tourneys, and as you might expect, good movies. All of these pursuits are taken pretty seriously, so when we get a chance to see something inspiring, adventurous and new we get pretty excited. Combine that enthusiasm for movie night with a story about through-hiking the John Muir Trail in California (of which some of our population here has hiked as well) and we pop the popcorn, pour the hot drinks and settle in for a long night in front of the “big” screen together.
-
Movies that are still on tour in the United States like Mile… Mile & A Half are tough to get down here and take a lot of preparation to obtain. I coordinated with The Muir Project crew roughly two weeks prior to movie night so we could get a copy of the movie downloaded in time to show here. I should mention that while we DO have 24 internet connectivity, it isn’t that… robust. That being the case, I set up the movie to download through the online service, VHX, over the night time hours. The next morning I came to a fully downloaded copy of MMAAH – or so I thought.
Sunday, November 4th at 730PM came at me fast. We eat dinner at 530PM and that’s followed by G.A.S.H. or Galley and Skullery Help. GASH is the process where we, the non-cooking population of the station, pitch in to help clean up the kitchen and common areas after dinner every day. I was assigned to GASH duties on the movie day which left me precious little time to prepare the movie ahead of time. After cleanup I ran over to the TV lounge and rigged up the movie through my laptop. The crowd, popcorn in hand – became immediately transfixed by the scenery. Green is a color not too often found this far south, so witnessing California’s rugged peaks and lavish evergreen trees melted our snowy souls.
Then, in true Antarctica fashion, we were thrown a curve ball when we least expected it. It seems our downloaded copy of the movie had somehow errored out at some point during its download two weeks earlier which had rendered the movie unwatchable at the 30 minute mark. Thinking fast, my fellow IT coworker and I sweated through several minutes of troubleshooting the file until we ended up switching gears away from watching the downloaded copy and towards using VHX’s amazing streaming service – using it to pick up where we had left off. Even with our sketchy internet, which is traditionally notorious for hobbling online streaming videos, the VHX service came through for us and carried on the torch as best it could to finish the last hour of the film.
Like true Antarcticans, the crowd easily endured the unplanned delay and the sporadic periods of video buffering. Again, we were captivated with images of lofty alpine peaks, warm sunny days, and that ever precious greenery. After the showing everyone gave a happy round of applause and heaps of thanks. Later, the movie inspired numerous conversations of trails gone by and trails we were all eager to hike someday.
-
For several days afterword, my fellow ‘station-mates’ would ask me for more information on the movie – where it was available and how they could get a copy. They loved it and I loved showing it. The Muir Project srew produced something special with Mile… Mile & A Half and that certain specialness was not lost on us Antarcticans – despite the yawning miles in between us and the greener pastures of California’s John Muir Trail.
Gear and Tips for Filming & Photographing in the Wild
28 Jan
Over the past two years, we’ve been asked a lot for wilderness shooting advice, so here is some advice from Jason for capturing your next adventure, be it in Yosemite or any remote area.
STAY STEADY:
First and foremost bring a tripod. Hand held shots are great, and create a nice effect of being on the trail, but if that’s all you have the audience will get motion sickness. I know it sucks to have to carry one, but a lot of the carbon fiber ones have gotten lighter. I brought a Manfrotto 055cx3 with a Bogen 701 fluid head. Really a good thing to have forpans and tilts. It weighed in at 5.5 pounds which is a lot for weight weenies for sure, but it really did a great job of supporting our cameras and our dolly slider. There are lighter and smaller alternatives that might not work as well, but it really is essential if you want your film to look polished.
If your lower back or weight conscience won’t allow you cary the weight, there are a couple of alternatives. The Leki mono-pod trekking pole was a great alternative to the tripod for when you want a steadier shot without pulling off your pack to get the tripod. (Ric was able to use it to great success.) However emphasis on the word “steadier” in that sentence. This one takes practice.
Gorillapod. Do it. It was so helpful. There were plenty of times that we all may have passed a great shot because we just couldn’t take the time to unload our pack. Having the gorillapod attached to his pack helped Ric get a locked down shot without pulling down the tripod that I was carrying. The final support item is less necessary, but a nice find. It’s not a sturdy as the Kessler Pocket Dolly we brought, but a heck of a lot lighter and fine for a DSLR with a smaller lens.
Keep in mind too, that we had a good sized team. If it’s just you it would be hard to bring all of these, but at the very least I reiterate BRING A TRIPOD!
CAMERA:
What camera should you bring? Well that’s up to you. The Nikon D800 and Canon 5d MIII are kind of the current leaders for DSLR video shooting, but there are a lot of great cheaper and lighter alternatives. Besides the Nikon D7000 and the Canon 7D, I’ve seen some really nice stuff shot with this Panasonic:
There’s plenty of blogs out there detailing what camera you should buy for what price, and what you should do is figure out your budget and go from there. At the end of the day, cameras are really good now! Stick with one that has a good amount of people using it for video and maybe a good user group online for advice and you should be ok. For all of the sound and thunder surrounding which is the best camera at the end of the day we believe that it’s what’s in front of the camera and the imagination used to capture it that’s most important.
The new kid on the block is Blackmagic. I’ve just got their Cinema Camera and I really love it. It’s not the lightest camera, but as far as price versus image you can’t really do better right now. The fact that it shoots both Raw and Prores makes it a great option. You can shoot Raw for your contrasty and glamour shots, and Prores for interviews or more evenly exposed shots. Raw is a memory pig, so I would suggest using it sparingly. And even more exciting for backcountry use is this new Pocket camera: http://www.blackmagicdesign.com/products/blackmagicpocketcinemacamera/
It will be a while before it can be matched for size and weight to quality of image. Also, keep in mind the BMC aren’t still cameras as well as video cameras like the DSLRs.
I would also recommend having a second smaller camera on you. We brought a GoPro and at the end we wondered why we didn’t use it more. The newest one has a really nice image, and they are so small and compact that they make it super easy to shoot with. If you have an Iphone or high end android your phone will also have a good camera in it. Always good to have one handy for quick and easy shots. You certainly sacrifice quality, but it is nice to have more shots at the end of a trip.
Jen opted for her go-to NikonDS-3. It’s heavy, but tough, and allowed her to handle low-light situations, even though eyes boggled at the size of the camera she toted.
LENSES:
Just as important as the camera itself and maybe even more is your lens selection. Frankly, I’d take a slightly lesser camera with a better lens over a great camera with a slow cheap lens. If you’re only bringing one zoom for a full framed camera, we would recommend one of the really good 24-70 fixed 2.8 zooms out there. Canon and Nikon both have one, and there’s several others made by Sigma and other aftermarket lens makers. If you like wider or tighter shots there are of course other options. We just found that most our shots fell within those focal lengths. If you go with a camera with a smaller sensor, then figure out what your crop factor is and make sure that you can get a lens that will get you somewhere close to the equivalent of around a 20mm on a full framed camera. Prime lenses are generally faster and sharper, and if you can bring along a good range of them it will make your images that much prettier. If you want to shoot some night time-lapses you will definitely want to bring at least one fast prime.
You will definitely need to bring Polarizer and ND filters for your lenses. Because shooting video on a DSLR works best when you keep your shutter at 1/50, the only other way to cut down light in camera is by stopping down your aperture. Using a Polarizer and ND filter on our lenses allowed me to shoot between a 5.6 – 1.8 when I wanted a shot with a shallow depth of field during the middle of the day. These really are a must, and make sure you have them for all of your lenses.
POWER:
There’s a couple of options for power. We brought a Goal Zero solar panel set to charge the batteries for Ric and Jen’s cameras. It worked great and mostly kept all our phones charged, but you have to be diligent about setting it up first thing in the morning, anytime you stop for an extensive break, and when you get to camp before dark. We were pretty lucky to have clear skies most of the time, and I took that for granted. When the cloudy days showed up, I realized how hard it was to keep charge. I went with the bulk method. I brought 8 5d batteries with me. There are a few places you can recharge along the trip (Reds Meadow, Vermillion, Muir Trail Ranch,) and that was plenty for me. If you can I would plan to stay at Muir Trail Ranch. It’s nice to have a meal and a shower!
Obviously, with all of the hiking you have to do, you won’t be shooting 8 hours a day so each battery lasts a few days. And yes we know it’s hard, but resist the urge to review footage and keep your LCD off as much as you can. That’s what really eats up battery power. As for cards I would do the bulk thing as well. Better to have them and not need them, than need them and not have them. They make them up to 64 GB now, but I’m always afraid to use those on a backcountry trip. If it was lost or broken you could lose a weeks worth of material versus a day or two if you use an 8 gig card. We had friends meet us along the way which made this easier. You could always stash cards with your food drops so you’re not carrying them the whole way. The extra weight sucks I know, but without power and media you’re camera is just dead weight.
CASES:
As for a case I would recommend a toploader rather than a harness. They are easy to strap to your belt or chest strap and they offer protection from all of the elements. This is the one I use: http://www.lowepro.com/toploaderzoom and Jen had a ThinkTank that extended to accommodate longer lenses.
Passions run high amongst the camera blogesphere, and for sure there are a lot of contrary opinions to much of this. However, this is what worked for us. The bottom line is to go out there and enjoy your trip. If you can take some time along the way to set up your shots, and carefully choose the gear options that work best for you then you will certainly be happier with the results at the end of your journey. If you have more questions please shoot them our way, and we’ll do our best to help out. Also, please share what you get out there!
Our Gear List:
- Nikon D3S (for stills and timeplase)
- Nikon D7000
- Nikon Lenses shared between D3S and D7000
- Nikkor 24-70mm/f2.8
- Nikkor 105mm/f2.8
- Tokina 17mm
- Canon 5D MarkII equipped with 24-105 f4.5-5.6
- Canon Vixia HF10
- Kessler Pocket Dolly 27″
- GoPro HD
- Sound Devices 302 mixer
- Sound Devices 744 recorder
- Stereo pair of Sennheiser 8040′s
- 2 Sennheiser 416′s
- Aquarian Audio hydrophone
- Goal Zero Elite Solar Panel and Battery
** Please note: there have been many new products introduced for stabilizing and holding your gear since we took ours out, so do a quick search before you buy.